Thursday, August 22, 2013

August Tri Polish Challenge Day 2

Hello everyone :D

Today is the second day of August Tri Polish Challenge. For this manicure I decided to, again, combine the gradient and dots like I did before on my first manicure for August TPC. I'm just in love with graient and dots combo lately, don't know why.

So here it is!

A door handle ruined my half-dry left hand manicure so meet my right hand :D


Well,. that's all! Thanks for reading and I hope you guys enjoyed it :D

God bless you

Wednesday, August 21, 2013

Monday Challenge (Sooo late, girl!! --") - Untried Color

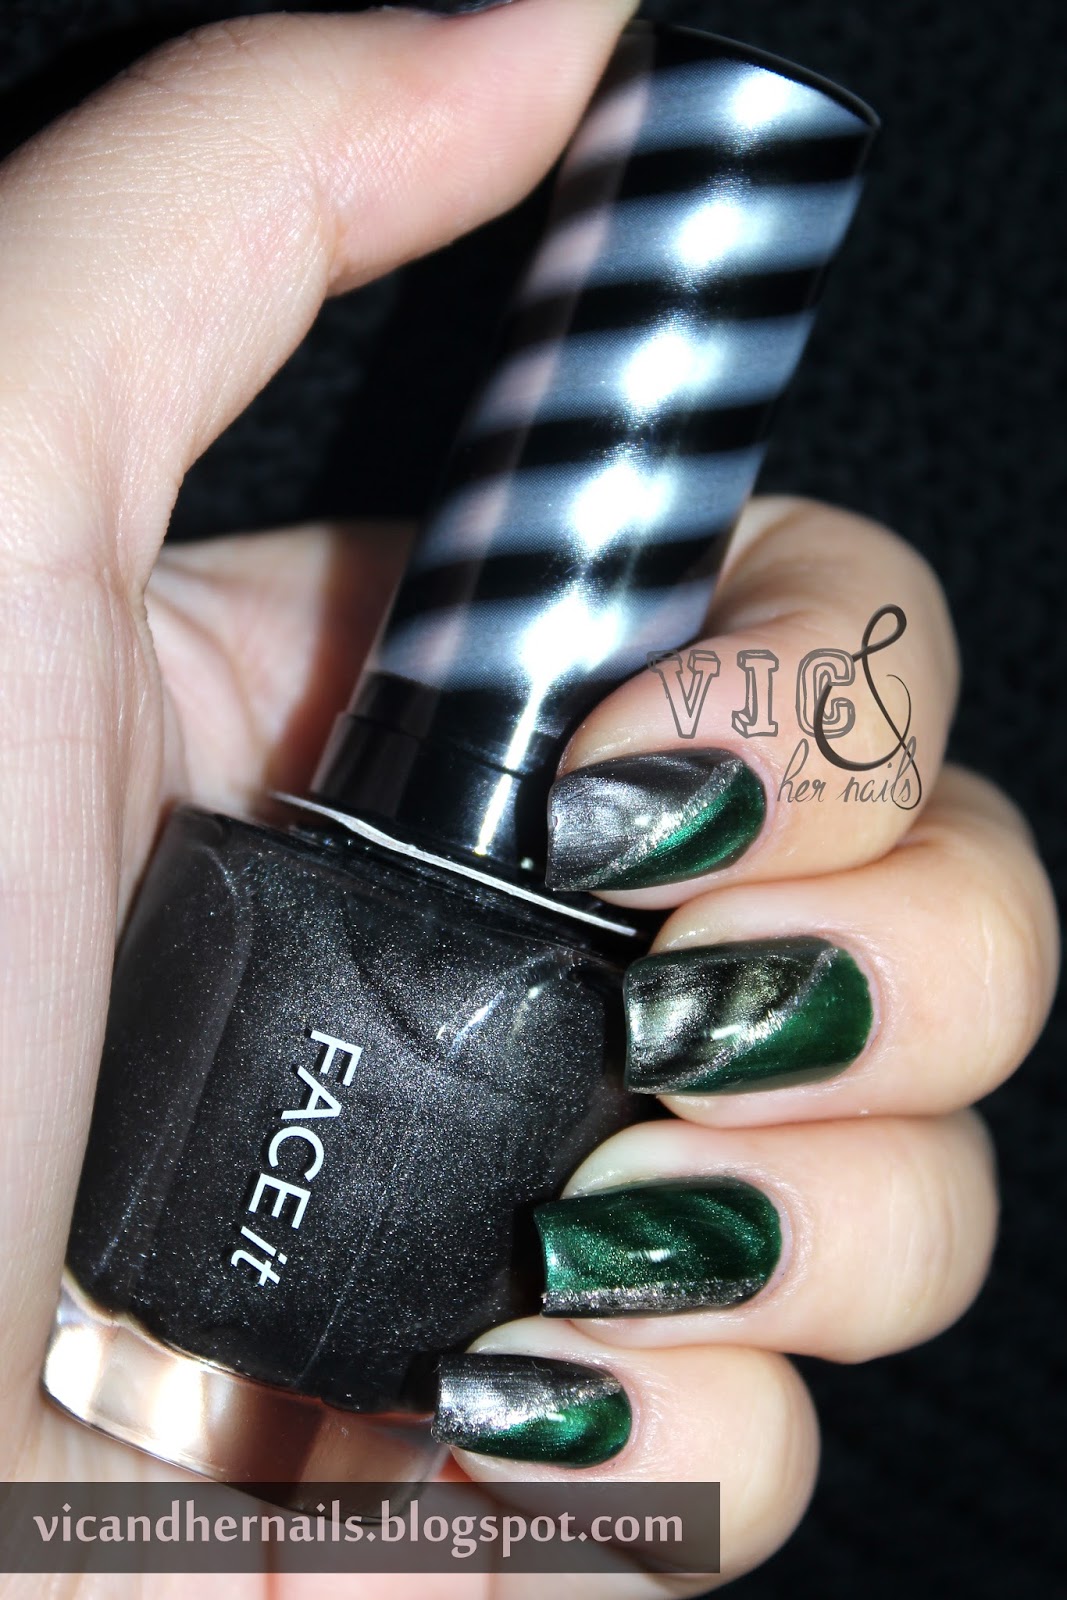
First time trying the magnet polish.. kinda fail --"
On some parts the magnet effect didn't show up.


Here they are, my untried polishes.
- The Face Shop Magic Magnet BK901
- The Face Shop Magic Magnet GR501

That's it and I hope you enjoyed it girls :D

God bless you
Love, Victoria
(o.o)V

Tuesday, August 20, 2013

August Tri Polish Challenge Day 1

Hi everyone :D

Today is the first day of August Tri Polish Challenge hosted by Debbie Crumpet. And again with "first time", this is my first time joining this challenge! Yaaaaay!! The main point of this challenge is you have to use the exact same three polishes from your stash with the determined colors (for this month is red, yellow, and green) and stick to those polishes until the end of this challenge.


For this month, I choose these polishes.


- OPI Come to Poppy
- Revlon Electric
- Etude House Ice Cream Nails GR701


 Well, that's it guys! Thanks for reading and I hope you guys enjoyed it :D

God bless you
Love, Victoria
(o.o)V

Marble Stone Jewellery Nail Tutorial

Hey everyone!

Do you still remember my OMD Challenge Day 27 - Jewellery? Here is the picture to remind you in case you forget.


I'm surprised that so many people love this manicure since the OMD challenge up until now. So I decided to make a tutorial detailing how I do it. I'm so excited in typing this post because this is my first nail tutorial post. Well, because it IS my first attempt in doing nail tutorial, I hope it won't turn into a pretty big mess.

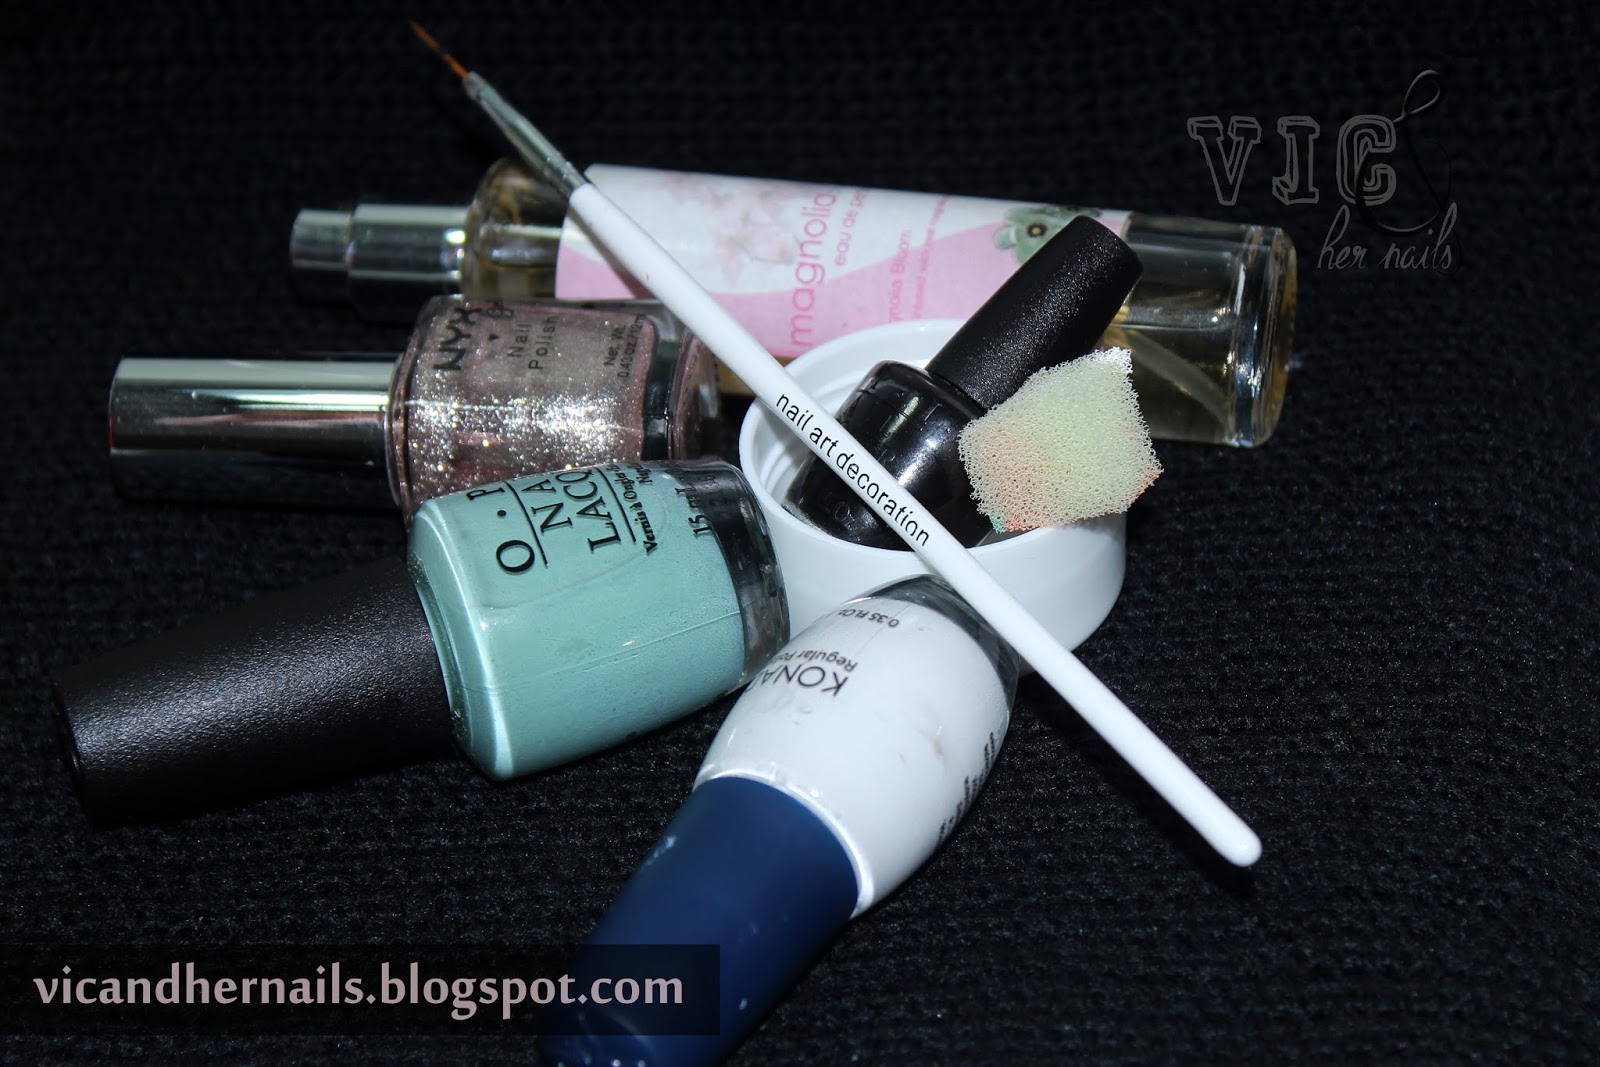
WHAT YOU NEED
 - White polish (I used Konad Regular Polish White)
- Your base color polish (I used OPI Mermaid's Tears)
- Silver or gold polish (I don't have any so I used NYX Sunday Afternoon)
- Black polish (I used OPI I Only Date Werewolves)
- Parfume or any other alcohol-based spray
- Sponge
- Striping brush
- Cup (any cup will do as long as it fits when you dip your fingers in it) filled with room temperature filtered water

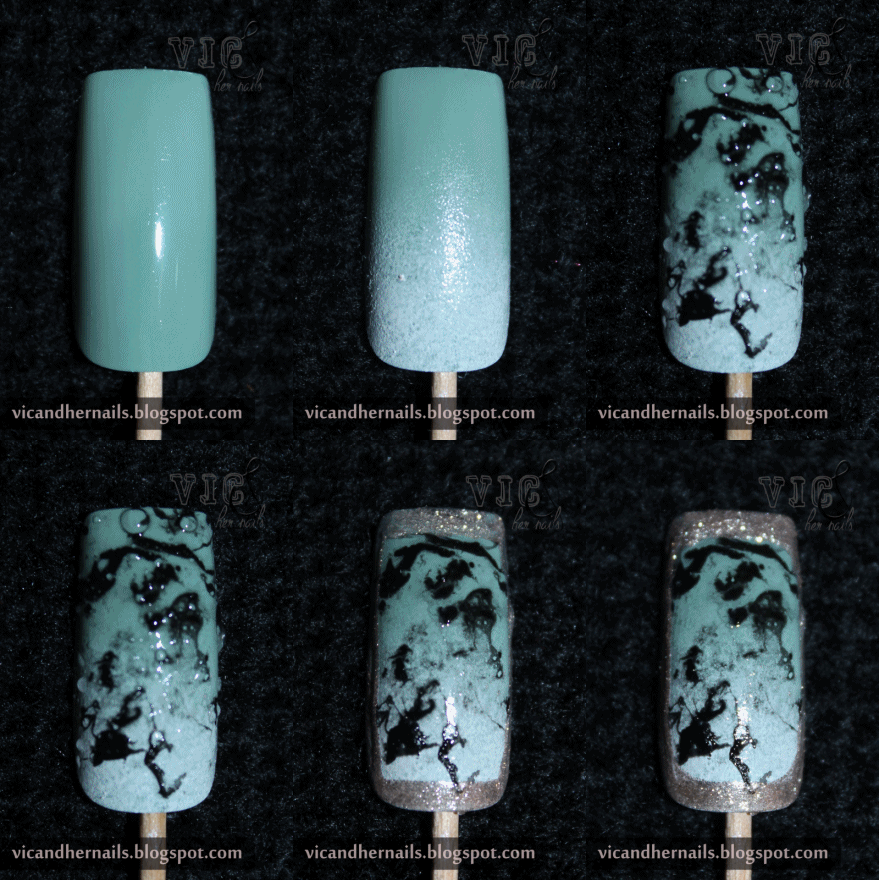
STEP 1
 Paint your nails with your base color polish.

STEP 2
Make the gradient with white polish and your base color using a sponge. The white gradient will create a highlight on your nails to make an illusion of shiny stone jewellery.

STEP 3
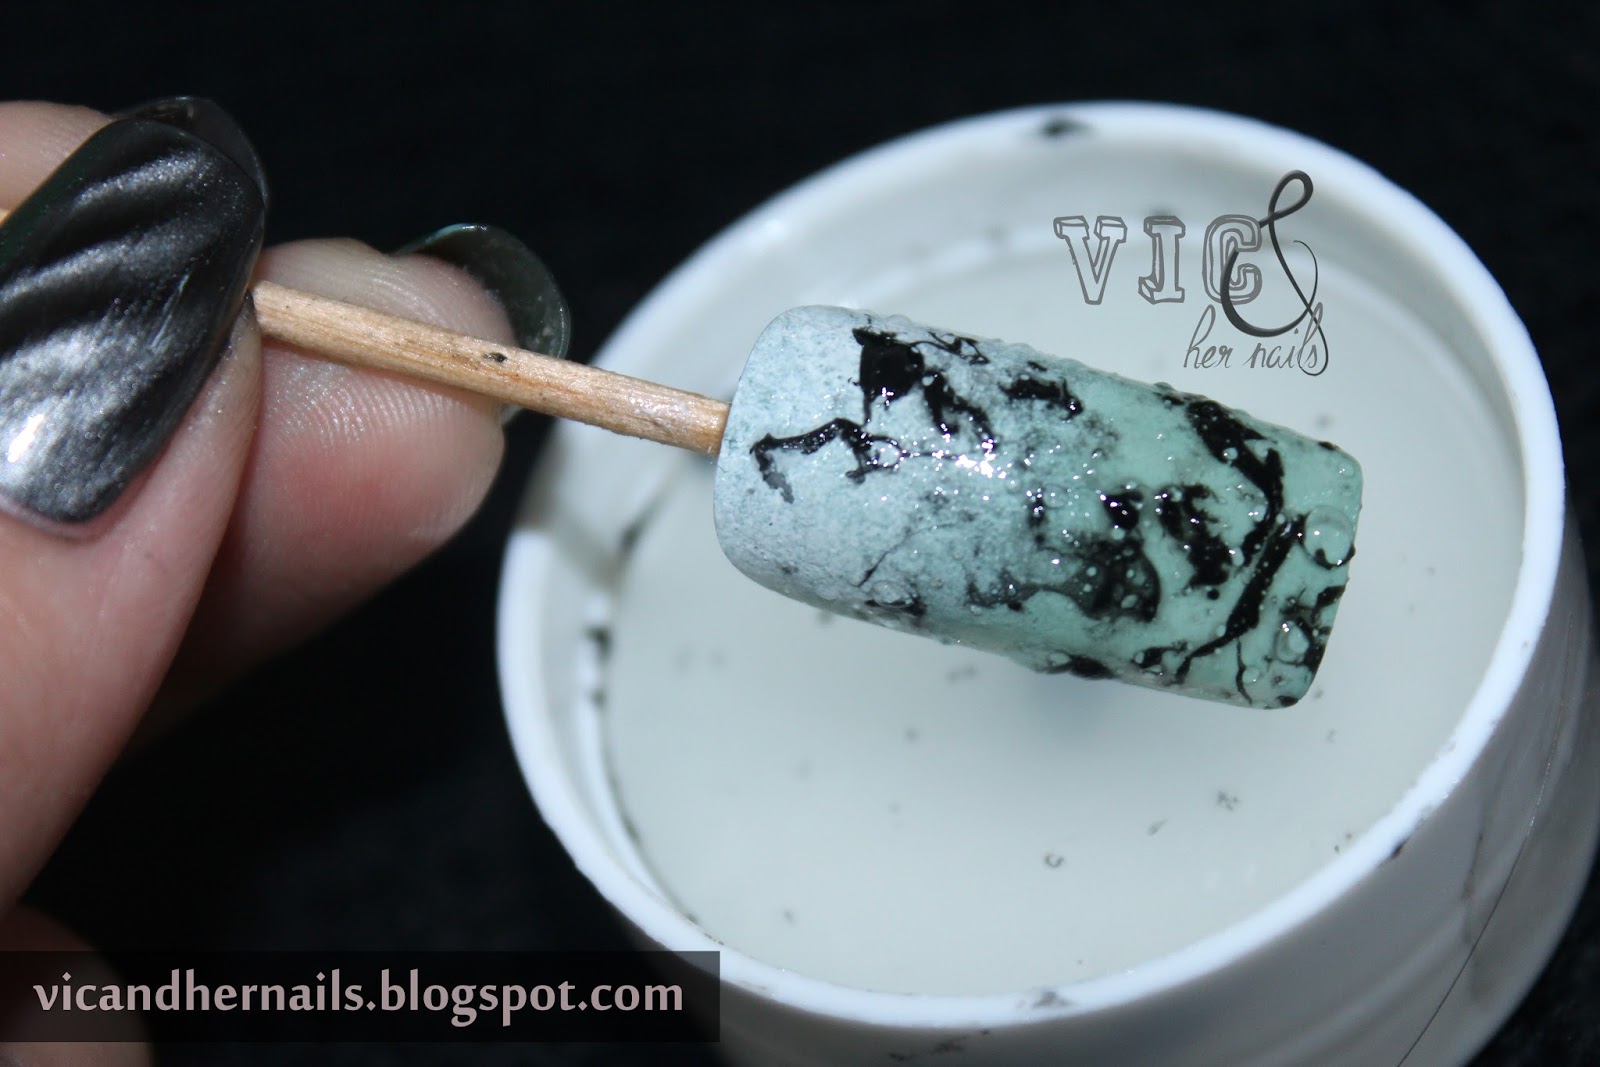
Prepare your black polish, parfume or any alcohol-based spray, and a cup filled with water.
Drop two or three drops of black polish and then spray spray spraaay
(Well, it's not as good as my first attempt --" I kinda fail this time)
Dip your nails.
(See? It's not quite good --")
(So I redo the process to make it looks... better?)
Don't worry if you make mistakes because for this effect I think the messier the better.

STEP 4
After your nails all dry, prepare your silver or gold polish and your stripping brush.
Then border your nails.

STEP 5
Smooth the edges by adding curves. 
Just simply follow your nail shape for the border.

Last, apply top coat.
AND IT'S DONE!!


Well, that's all guys. I hope you enjoyed my first nail tutorial.
(I'm sorry if I made mistakes in this tutorial.)

Aren't you interested in trying? If you are, share your re-creation with me by leaving your link on the comment below!! :D

God bless you
Love, Victoria
(o.o)V

Monday, August 19, 2013

N.A.I.L. - Theme 3: Sand

N.A.I.L. - Theme 3: Sand


 It should be looked like "SUMMER" but I failed.


The main problem when I made the sand effect is I don't have any brown textured polish (a.k.a. I only have one textured polish, OPI Pussy Galore)


So I tried to dabbed my light brown polish with sponge over my one and only textured polish and violaaa.. the light brown beach sand effect is created!


FYI, voting for the N.A.I.L. theme 2: Sea now is open so you can vote here and you have three votes.
Here's my sea manicure!

Well, that's it guys! Thanks for reading and I hope you enjoyed my post :D

God bless you
Love, Victoria
(o.o)V

Saturday, August 17, 2013

Ice Cream Mani and Etude House Ice Cream Nails Swatch

Hello everyone!!

I promised to make a swatch and review post from my Korean haul before so this is it, my first (again with "first time") swatch and review post!! But first thing first, of course, let's begin with nail art!!


Polishes I used:
OPI Natural Nail Base Coat
Etude House Ice Cream Nails OR201 (thumb)
Etude House Ice Cream Nails GR701 (index)
Etude House Ice Cream Nails PK001 (middle)
Etude House Ice Cream Nails BE101 (ring)
Etude House Ice Cream Nails PP501 (pinkie)
Etude House Ice Cream Nails BR401 (chocolate sauce)
Revlon Super Top Speed 60 Second Top Coat

Now is time for swatch and review!
This is my first time swatching and reviewing so I hope it's not really... strange?
Here we go!

Today I begin with my Etude House Ice Cream Nails collection. Speaking of Etude House, it reminds me of my local tour guide when I was in Korea. He always said "Attitude House" instead of saying "Etude House". And I always laughed that time. Always. Even now as I'm typing this up. Hahhahaha! Well, he's a guy so I think it's normal to know nothing about that Korean cosmetic brand, although he's a Korean.

Etude House Ice Cream Nails, as its name, has a really cute ice cream cone packaging and wonderful yummy colors that I can't resist. Too bad I didn't get the blue mint one because it's sold out in every stores I visited. Aaaargh that one is my favourite!!

For this swatches, I used OPI Natural Nail Base Coat and I skipped top coat to see how their real shine are. Their formula is rather thick and goopy but fortunately the polishes went on quite smoothly on my nails and some were opaque enough in one coat. I've read some reviews of these polishes and a lot of people don't really like the application because the cone shaped handle is lightweight and a little hard to hold. But I didn't have any trouble with the application as I'm quite comfortable with their wide brushes and those cute cone shaped handles. One thing I don't like about these polishes is they have very strong chemical smell. This is the first time I got a little dizzy after applying nail polish. I even wore my dad's extra surgical mask (my dad is a doctor) to cover my nose.

 
Etude House Ice Cream Nails OR201, two coats.

Etude House Ice Cream Nails GR 701, two coats

Etude House Ice Cream Nails PK001, one coat.

Etude House Ice Cream Nails BE101, two coats.

Etude House Ice Cream Nails PP501, one coat.

Etude House Ice Cream Nails BR401, two coats (I did french manicure first to test the opaqueness... Opaqueness?.. Opacity?... Whatever.)


Overall, I love everyone of them. Really love their colors, really love their seriously-I-can't-resist ice cream shape, don't have any problem with the application. And I didn't have any significant chipping problems. Oh, and they're cheap! Insanely cheap!! Retails for 2,000 won which is around $2 per bottle and there was 1+1 (buy one get one free) deal going on. Wow! Seriously! $1 for one bottle of nail polish! How insanely insane that is! One thing I hate about them is their very strong chemical smell. Well, let's say it's the trade-off for the super low cost. 

Have you ever tried any of them? And what do you think? Let me know in the comments below.

Well, that's all guys. I hope you enjoyed my first nail art+swatch+review post.

God bless you
Love, Victoria
(o.o)V